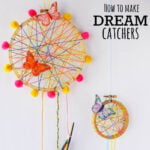
How to Make a Dream Catcher
Yield: 1
Equipment
- Embroidery Hoops - Use a large is 6" diameter hoop and small is 3" hoop. You can even use a metal hoop
- Embroidery Floss - Choose your favorite colors
- Pom Poms - Make with various colors and sizes
- Feathers You can use various colors
- Butterfly Floral Picks - Butterflies are added for sweet dreams
- Low Temperature Hot Glue - Using a hot glue gun allows for the items added to be secured
- Scissors - We recommend adult supervision
Instructions
- Step 1 - For the 3" dream catchers, you'll want to cut your embroidery floss about 18-24" in length. For the larger, 6" hoop, you will want to cut your embroidery floss about 30-36" in length.
- Step 2 - Once your embroidery floss is cut, attach a small dab of glue to the back of the hoop.
- Step 3 - Gently press the embroidery floss into the glue and let set to harden on the rim. Loop the floss around the hoop wrapping in any and all directions. Secure the remaining tail or last knot on the back of the hoop with hot glue.
- Step 4 - Trim the excess. Repeat for the desired number of colors, attaching it to a different area on the back of the hoop when you begin. When you are finished, cut pieces of embroidery floss and weave them through the bottom of the hoop.
- Step 5 - Tie the remaining end around feathers and attach pom poms if desired. Add additional feathers and if you want to be creative, braid three pieces of floss together to create a different look.
- Step 6 - Add pom poms and butterflies to your dream catcher to encourage sweet dreams even at the bottom of the dream catcher! Finally add embroidery floss to the top with knot for the hoop to hang!
Notes
DIY Dream Catcher Tip
Embroidery Floss - Don't separate the embroidery floss. You will use six strands!
Gluing the Floss - Allow the glue to set on the hoop so that is secure.
Top of the Hoop - Make sure to leave a 6 inch tail to hang the dreamcatcher.
Variations and Additions:
The dreamcatchers can be made with in a variety of ways and can easily be found at your local craft store. Here are some of our favorite additions that my kids made with theirs.
- Thread Wooden Beads on the embroidery floss with a needle if needed
- You can also use yarn instead of embroidery floss
- Add your favorite color of ribbons
- Gemstones are always a great addition Fold a piece of suede lace for a beautiful addition
- Other additions include leather, colorful fabric, and twine. Use a hole punch so you can thread on the dreamcatcher