DIY Unicorn Headband
Save money and make this DIY Unicorn Headband with supplies from the dollar store! It is so easy to learn how to make a unicorn headband and your kids will love it!
Yield: 1
Materials
- Plastic Headband
- Glitter Foam or Paper
- White and Pink Construction Paper
- Fake Flowers - We used pink but use your favorite colors or what you have on hand
Instructions
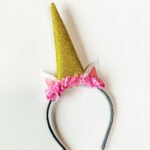
- Cut the glitter foam or paper into the a large triangle with the top cut flat. For the cone I created, the base is 7 inches, the sides are 7.5 inches and the top is 1 inch. Also cut the flowers off of the stems.
- Next cut triangles out of of the white (base is 2 inches and sides are both 3 inches) and pink (base is 1 inch and side are both 1.5 inches) construction paper and glue the pink ones onto the white ones. We used school glue for this process.
- Next gently wrap the glitter triangle to form your unicorn horn and seal it with glue. We used hot glue for this process. Cut the base to even out the side if needed.
- Next place the headband inside the horn and seal with hot glue as well.
- Next glue the ears next to your horn and onto the headband. We used hot glue for this step as well.
- Then with the hot glue gun, glue the flowers on the front of your headband at the base of the horn and the ears to cover your seams.
Notes
*All our supplies were purchased at a local dollar store.