DIY Snow Globe
This DIY Snow Globe is a fun craft activity for the entire family. Homemade snow globes are a blast to make and so easy and budget friendly.
Yield: 1
Equipment
- Modeling Clay (note: This is clay that won't dry out. You cannot bake it, you cannot air dry it. It's important to only use modeling clay)
- Small Jars and Lids
- Distilled or Purified Water
- Fine Glitter
- Black Acrylic Paint
- Paint Brush
- Acetone optional
- Cotton Balls optional
- E6000 glue optional, could also use epoxy for plastic
Instructions
- Remove all labels and glue/adhesive from jars. I find acetone works best for the sticky residue as well as any printed codes on the jars.
- Wash jars and lids with warm, soapy water, rinse well and dry completely.
- Paint jars with black acrylic paint, allowing to dry completely between coats.
- Shape clay onto the lid of the jar. Make sure you keep the base of the clay sculpture inside of where the rim screws on.
- Add any animals or items you'd like. Secure by pressing firmly onto the lid.
- Fill the jar with glitter, making sure the bottom is just covered. Add water and fill almost completely. Place the lid onto the jar and twist tightly. Flip over and shake your jar and see your snow globe!
- Optional: Glue the jar lid onto the jars. Before placing the lid on the jar, add a swipe of E6000 glue or epoxy to the rim of the jar. Twist the lid on and set overnight to set up.
To make the penguin:
- Start with a black piece of clay and shape it into an oval. Flatten the bottom and sides. Use a toothpick to create wings. Flatten stray clay with your fingers. Place a white face/belly onto the front of the black body and follow with small eyes and a yellow beak and feet. Place onto a white arctic iceberg on the jar lid.
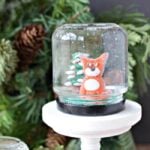
To make the fox and tree:
- Start with two orange pieces of clay and shape as shown. Press head and body together and add a tail. Add a white face and belly. Use a toothpick to make front leg shapes. Add eyes and nose. To make a tree, take a piece of brown clay and shape it into a trunk shape. Roll green clay to make the tree branches and add pieces of white by ripping the clay and flattening it in your fingers before applying to the green boughs.
- Place the tree and fox onto a bed of grass covered with some white patches of snow.