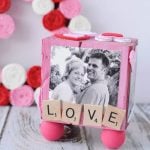
DIY Photo Block
We have an adorable DIY Photo Cube that is perfect to show off cute pictures of the kiddos. This one is decorated in pink and red with lots of hearts for the perfect gift for Valentine's Day.
Equipment
- 4" block of wood (I used a piece of a 4x4 fence post)
- Acrylic Paint in Pink and Red
- 4 1" round wood ball knobs
- White Glue or Hot Glue
- Valentine/Heart Ribbon
- Heart Foam Shapes/Stickers
- Adhesive Felt Heart Shapes
- Paint Brush
- Paper Trimmer or Scissors
- 4 Photos
- Scrabble Tiles or Adhesive Foam Letters
Instructions
How to make Wooden Photo Block:
- Step 1 - Attach the wooden balls. Use white glue to attach the wood balls onto the bottom of the cube. Let set to dry completely.
- Tip: Often wood is listed as 4" x 4" fence post, but in reality it measures 3.5" x 3.5" so be mindful of this when choosing and cutting photos for your project.
- Step 2 - Paint the cube and feet as desired. I decided to paint 2 sides red and 2 sides pink. Let dry completely. A second coat may be necessary depending on the type of paint used on the sides of the blocks.
- Step 3 - Use a paper trimmer to cut your photos about 3/4" smaller than the cube.
- Step 4 - Adhere the pictures. Attach photos to the cube with white glue or hot glue. Let set to dry.
- Step 5 - Decorate the block. Add embellishments such as scrabble tiles, foam heart stickers and ribbon. Affix with white glue or hot glue.
- Step 6 - Allow to dry. This adorable handmade gift needs time to dry after adding the embellishments.
How to make a Photo Cube for any occasion:
- This DIY is very easy to modify for any occasion. All you need to do is change the paint colors and embellishments.
- You can easily match any décor, holiday or theme by doing this. If you would like to use this year round, try neutral colors that match the recipients home décor.
- This photo blocks diy makes it easy to paint the blocks any color you choose.